Dia-fuckin’-fine

51210023

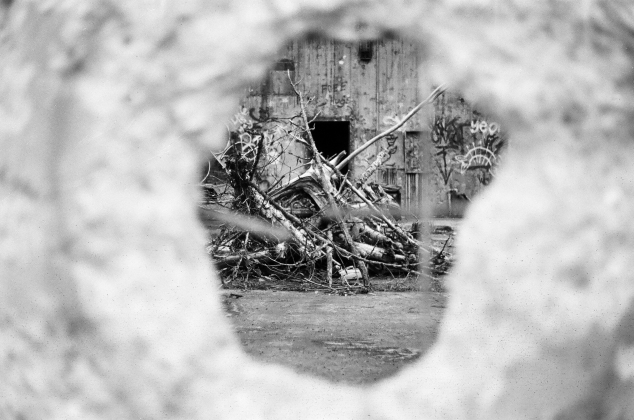
Hole in the wall. Abandoned Nike-Hercules base “Site Bay” in Alaska. Fomapan 100 at ISO 120 processed in Diafine.

I want to introduce you to my newest friend, Diafine. It’s a great developer for lazy asses like me who like to shoot lots of different films at different speeds, including pushed a stop or two, and don’t like to hassle with specific temperatures and times and all of that nonsense.

With typical one-bath, one-shot developers, you simply immerse the film in the developer allowing a reaction to happen. You have to process for a specific amount of time depending on the film and your desired push/pull. During this time fresh developer (supplied by agitation) reacts with the film emulsion and then you dump the spent developer.

Diafine is magic because it’s a two-bath developer. You immerse the film in bath A for three or more minutes (every film is the same) which is how long it should take to fully saturate the emulsion. Then, the film — still holding the bath A chemical it soaked up — is exposed to bath B and the two chemicals react together with the film emulsion. Because there is a limited supply of bath A contained within the emulsion to react with the bath B chemical, this leads to some interesting results: Continue reading

Pull out all the stops and prevent indecent exposure!

[Preface: this guide is primarily written for newbie film photographers; but I will try to point out the analogous functions of digital cameras. On a fundamental level, it’s all the same.]

I’d guess that 99% of the time these days, when someone takes a picture, they just point their cell phone or digital point-and-shoot or even higher-end digital SLR at the subject, let the camera quickly compute all the settings needed to take the shot, and the snap it. A lot of the time, this is sufficient. However, if you’re using a film camera with manual settings (or just want to override your newer film or even your digital camera’s auto mode because its guesstimations aren’t giving you the results you want), you have to understand how to dial in the exposure yourself.

There are three main ingredients to exposure: the intensity of the light entering the camera, the amount of time that light is allowed in, and the sensitivity of the film (or the sensor, for you digital kids). Most cameras will allow you at least some control over all of these settings, and they are all interrelated so if you keep that in mind, you will be able to compensate for a lack of control in one factor by adjusting the other two. Sound complicated? It’s really not. Let me explain further. Continue reading

What happens when you put your film in checked baggage?

Answer: you get weird-ass bars and waves in your photos.

Yeah, ok, so I’m an idiot.

I just went on a multi-state tour performing music and took a lot of photos along the way. Despite all the interwebs warning me not to, I put about a dozen rolls of film in my checked baggage on two flights. I actually thought this was the safe thing to do; as you may have noticed, the carry-on baggage screening warns against putting high-speed (ISO 800 or greater) film through the x-ray machines; although all my film was 400 or slower I figured “why chance it? I’ll just keep it in my checked luggage”.

Little did I know that airport security also subjects your baggage (and any film therein) to different forms of electromagnetic radiation, apparently to detect explosives or whatever. And being the idiot I am, when I processed the rolls of film at home and 3 of the 4 I developed came out with weird artifacts on the film, I just assumed I had loaded the spools wrong or something. It wasn’t until I took one of them in to get scanned that the helpful folks set me straight.

Maybe you guys knew this already, and in that case, kudos to you. But I actually found the effects to be more interesting — and worse — that I imagined. Googling “film in checked baggage” suggests that it will “fog” your film, which sounds like it’s not desirable but probably something you can just massage out with some curve adjustments in photoshop. No…it fucks it up pretty decent. Continue reading

Thoughts on Ektar 100

I recently shot my first roll of Kodak Ektar 100 — a slow film with a reputation for punchy colors. I actually had purchased it this winter, but you can imagine winter in Anchorage is pretty dreary, lifeless, and dark. The good news is that the summers are the total opposite: blue skies and sunshine for 23.9 hours a day, seas of green everywhere you look (much to the chagrin of my seasonal allergies) and understanding bosses that know you just wanna get the fuck out of the city and into the wild on a Friday afternoon. So I pulled the roll out of the deep freeze and snapped off 38 frames to see how it panned out.

04700025 Continue reading

Home Processing: attempt #1

So this weekend I had a vasectomy. Good times! The rest of my family went on a trip out of town while I had nothing to do but sit around and be lazy (with good reason). Coincidentally, I made a splurge (for my broke ass) and bought the stuff I need to home-process 35mm black and white film. So in the week leading up to my snip snip I went out and about and burned two rolls of Ilford HP5+ so that I’d have something to do while my junk was on the mend and I had no one around to worry about opening the “darkroom” (read: bathroom) door.

The basis of my procedure was this article on Lomography. Now I gotta tell you guys something: I work quick, dirty, and sloppy. I cut corners if it saves me a few bucks (otherwise I’d probably just let the lab process my film for me) or significant effort. The process in that article seemed to get good results, so I suggest following it in general. I’m going to go through the areas where I deviated and point out what worked well and what didn’t. Continue reading

Batteries for the SRT101 light meter

My one, only, and first (real) 35mm camera is a Minolta SRT 101 dating to 1971-ish. It was apparently ahead of its time in terms of through-the-lens (TTL) metering and even by today’s standards it seems to work pretty damn good as far as I can tell.

That said, there is a small obstacle to getting the light meter running to begin with. The camera is designed to use the obsolete and hard-to-obtain PX625 battery. Of course, the light meter is the only thing that needs the battery, so if you can set up your shots by other means the camera works great. In fact, for a while I was using a light meter app on my smartphone and/or using the Sunny 16 rule as a basis for guesstimating the exposure, and that worked fine enough that I still occasionally forget that the camera even has a built-in light meter. But it’s definitely worth using.  Continue reading

Stairwell jungle

Ship Creek. Anchorage, AK. Feb 2016.

Anchorage, AK. Minolta SRT-101. Vivitar 28mm 1:2.8. Kodak T-Max 400.

In the stairwell of the building where I work someone has made a jungle. I used to go like to sit in there on my break and hang out or take a nap, but one day someone put about a dozen plants of various species and sizes in my sunny spot! Anyway, I just thought this plant looked cool and the way the sun came in the window was interesting, and a good opportunity to get close up to something.

What I learned about pushing film

This might not be news to anyone more experienced than I, but I’ll post it anyway to wrap my head around the concept and maybe help out the next newbie to come along.

I recently lamented the overall poor quality of my first attempt at taking indoor punk show photos without a flash, in the typical low light of a dive bar. I knew this was going to be a challenge but I thought that by pushing 400 film to 800 I would get good results. Overall, most of the photos were very underexposed and the ones that were were very grainy and I could do very little Photoshop magic to pull any additional detail, without exaggerating the grain. At the time this frustrated me, but now that I’ve done a little research on pushing film it all seems clear to me now. Continue reading